

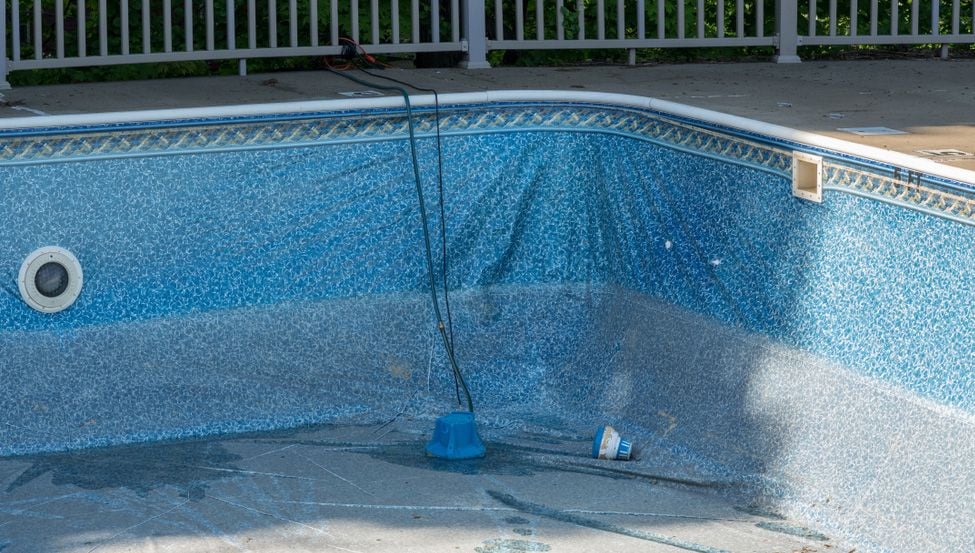
Do you own a vinyl liner pool and need to replace the liner? Maybe you’re still pool shopping and looking into what it will take to replace your liner in the future.
Whether you have a pool now that needs maintenance or you’re just educating yourself on the upkeep of your soon-to-be swimming pool, we’ve got you covered.
River Pools specializes in fiberglass swimming pools, but we know you need all the information on all the pool types in order to make an educated decision on what’s best for your needs. In this article, we’ll share what we learned through our experience and tell you all about pool liner replacement, including how much it costs, how to do it, and some tips to keep your liner in good shape.
Pool Liner Replacement Cost
The cost of your pool liner replacement will vary depending on your pool size, the type of liner that you buy, and the contractor that you hire to replace it (unless you decide to DIY the job).
Overall, you can expect to pay around $4,500 or more for the vinyl liner plus the labor to replace it, chemicals, and water to refill your swimming pool.
How often do you need to replace your vinyl pool liner?
On average, inground vinyl liner pool owners need to replace their liners around every 5-9 years. The lifespan of your pool’s liner also largely depends on how the pool is maintained, so some will have to replace their liner sooner and others can go a bit longer.
Rips and tears might be fixed without replacing the entire liner, but some damage is too extensive and needs more than just a patch up. Using harsh chemicals or not properly maintaining your pool water chemistry can also weaken the liner and shorten its lifespan.
If you just installed a vinyl liner pool or you’re about to, keep in mind that replacing your liner over a span of 20 years will cost you an additional $9,000 to $18,000.
How to know when it’s time to replace your vinyl pool liner
Pool liners don’t come with an expiration date, so it’s possible that you can extend the life of your liner by taking good care of it.
Having said that, we can tell you from experience that most people will see a need to replace their pool liner around the 5-9 year mark.
How will you know when it’s time to replace your liner? Here are the most common symptoms of a liner that’s ready to retire:
- Pool is leaking
- Liner is dry and brittle
- Needs constant patchwork or repairs
- Has a hole or tear larger than six inches
Note: If you have a leak, replacing your liner is the wise thing to do. Letting the leak go for long periods can lead to very costly damage to other parts of your pool.
How to Choose Your New Pool Liner
Pool Liner Thickness
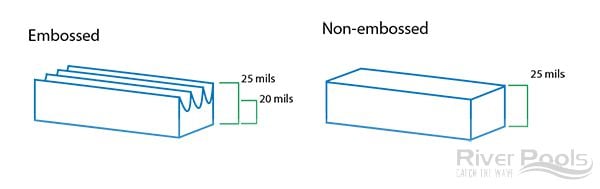
When it’s finally time to replace your liner, how do you know which one will be best for you and last the longest? To start and as a general rule, thicker liners are more durable and long-lasting. They are also a little bit more expensive, but if you can make room in your budget, a thick liner is worth the investment. Thick liners are more resistant to punctures and tears, but they may be a little harder to work with.
Note: There’s a difference between embossed and non-embossed liners. First, pay attention to whether the liner is embossed and then consider the thickness. Non-embossed liners are thicker all the way through, whereas embossed liners have uneven thickness. The thickness is measured at the highest points, which is why the thickness of embossed liners can be misleading.
Pool Liner Designs
When it comes to the color and design of your new liner, you will have dozens if not hundreds of options to choose from. In fact, vinyl liner pools by far have the most color options out of all the inground swimming pools, aside from tile which can be applied to concrete pools.
You’ll likely have the most color and pattern options in the blue family, but you’ll have tons of other colors to choose from including tan, grey, black, and green. You’ll also have a variety of pool liner patterns to choose from like tile, pebble, mosaic, seaglass, and marble.
Pro tip: Be sure to take a look at the liner’s warranty before you buy to see what it covers.
How to Replace Your Pool Liner
Replacing a pool liner isn’t a complicated process, but it helps to have some experience if you plan to DIY the job. We recommend hiring someone to do the liner replacement for you to minimize mistakes, but it’s still a good idea to learn about the liner replacement steps. We want you to know how it’s done so that you’re better equipped to ask your contractor or pool servicer questions before they get started.
If you won’t have someone helping you figure the size of your liner, you can learn how to measure your pool’s vinyl liner here.
Once you have your new pool liner ready, these are the installation steps that you would likely follow:
Step #1: Shut down your swimming pool. This means turning off lights, timers, and your pump and filter system.
Step #2: Drain the pool. Pro tip: we strongly advise that you get help for this. There is more than one wrong way to drain your pool and we don't want your system to get damaged or have your pool pop out of the ground.
Step #3: Remove the liner, faceplates, and gaskets. A utility knife is all you need to cut the liner from the pool.
Step #4: Remove the liner from the track, but be careful not to crack the track as you work.
Step #5: Examine your pool walls and floor for cracks, corrosion, and any other defects that need fixing before moving onto the next step.
Step #6: Fix all of the cracks and damaged areas as necessary.
Step #7: Sweep and clean the bottom of the pool. Make sure all dirt and debris are cleared before installing the liner.
Step #8: Install the liner foam onto the walls with spray-on adhesive (optional). Foam comes in a roll and is often used with metal wall panels to add an additional layer of protection.
Step #9: Place the box in the pool according to the markings on the box. Take out and arrange the liner as directed in the included instructions.
Step #10: Once your liner is lined up on all sides, you can begin tucking it into the track (starting with the corners at the shallow end). Be careful with the track if it’s brittle, and don’t use any sharp objects to force the liner into the track.
Step #11: Work any big wrinkles towards the pool walls to remove them.
Step #12: Once the liner is properly placed into the track all around the pool, you can insert a liner vacuum or a shop-vac under the liner to make it flush with the walls and floor. Make sure to seal off the skimmer lid and any open areas around steps to prevent air from leaking. You should also seal around where the vacuum hose is placed under the liner with rags or duct tape.
Step #13: Install your pool's main drain.
Step #14: Start filling the pool at the deep end and keep the vacuum running as you fill it.
Step #15: When the water is about ankle deep in the shallow end (around six inches), you can turn off the vacuum and restore that section of liner into the track.
Step #16: When the water is about a foot deep in the shallow end, replace the return, skimmer, and light gaskets and faceplates. Carefully cut out the liner inside the faceplates with a utility knife.
Step #17: Finish filling the pool with water.
Step #18: Start up the filter and balance the pool water chemistry.
A few quick pro tips:
- Be sure to read the directions completely before taking our your vinyl liner and fitting it into the track.
- Don’t use any sharp objects to insert the liner into the track.
- Don’t change your liner when it’s cold out. Warm or hot weather makes the liner softer and easier to work with.
- Make sure everything is lined up properly before filling the pool with water. The water can pull an improperly fitted liner out which will make you have to drain the pool and start again (needless to say, this can get expensive).
- Don’t feel like you have to use your old faceplates. Get new ones if your old ones are weak or brittle.
- Be careful with pool lights! If you’re not experienced with electrical work, hire an electrician to do this part. If you DIY your electrical work, make sure your breakers are shut off before you start.
- Don’t replace the gaskets and faceplates until the water has reached at least a foot in height in the shallow end. Doing this step too soon can destroy your faceplates as the liner stretches.
To DIY or Not to DIY
Generally, we advise against DIYing your pool projects if you don’t have any experience servicing pools and won’t have an experienced person to guide you. Hire a specialist to service your pool when in doubt, even if it costs more because it will help you avoid expensive mistakes.
How to Make Your Pool Liner Last Longer
As we mentioned before, your liner doesn’t have an expiration date, and it’s possible to extend its lifespan beyond the 5-9 year range. It’s important to follow these key tips if you want to save money and keep your pool liner in good condition.
- Don’t drain your pool or leave your pool empty for long periods. If you need to make repairs, make it quick!
- Maintain balanced pool water chemistry.
- Don't use sharp objects to clean out your pool.
- Be careful with your dog's claws (and make sure your nails are clipped, too).
Pool Liner Repair
Occasionally, your pool liner might get holes or tears, but you don’t always have to replace the entire thing. In fact, to patch your pool liner, you likely won't need to drain your pool. Small vinyl liner patches can be applied underwater, and you might even be able to use waterproof tape for small holes or tears.
These patches aren’t the best long-term solution, but they can stop a leak in its tracks and help to preserve the life of your liner for a little longer.
Alternatives to Vinyl Liner Pools
If you’re tired of changing your vinyl liner or you’re considering getting a different type of inground pool, you might want to consider installing a concrete or fiberglass swimming pool. Concrete and fiberglass pools are similar in price to install, but fiberglass pools require far less maintenance over time and cost much less to maintain.
Want to learn more? Feel free to visit our learning center, try out our pool pricing calculator below, or check out our catalog of models to see if a fiberglass pool might be right for you.

Want to see about how much that cost will be with all your favorite pool accessories?
Use our Design and Price Tool to walk through your options and approximate price!

Up Next:
How Much Does It Cost to Replace a Vinyl Liner Pool with Fiberglass?
How to Remove Wrinkles from Your Inground Vinyl Liner Pool
Top 5 Vinyl Liner Pool Problems and Solutions
Editor's Note: This article was originally written by Jason Hughes (Partner, River Pools® Virginia) on December 27, 2019. Any opinions expressed are those of the author. Any prices referenced were based on information that was readily available at the time.
River Pools is a brand of inground fiberglass pools produced in a manufacturing facility in Fortville, IN. While our expertise is in manufacturing fiberglass pools, we have access to a network of installers with expertise relating to project design, installation, and pool service. We often tap into this knowledge base and share information freely with homeowners, just like you, considering installing a swimming pool in your backyard.
Editor's note: This article was updated on September 11, 2024.