


As you explore this page you'll find a wealth of fiberglass pool installation info. We've compiled all of our construction related articles and videos right here.
You can get started with the following video that shows the entire fiberglass pool installation process from start to finish!
We're going to break the installation process down into six phases so let's jump right in!
How are fiberglass pools installed?
- Excavation
- Setting and leveling the pool
- Plumbing the pool and filter system
- Backfilling the pool shell
- Coping and patio
- Pool fence
Phase 1: Excavation
 What happens first?
When we pull into your driveway we hope to see your kids waiting with their bathing suits on because that's when we know it's going to be a fun job!
Our team will be driving two vehicles: a work truck towing a skid steer (or bobcat), and a large dump truck towing our excavator.
We use the excavator to dig the hole and lift and set the pool. The skid steer is used to move dirt and gravel.
The first thing the crew will do is paint the pool on the ground and use a laser level to establish how high to set the pool in the yard. This will tell us how deep to dig the hole.
We'll then position the dump truck close to the hole (if needed) and begin excavation.
While one crew member digs the hole the others begin to work on setting the pump and filter system.
Excavation of the hole usually takes between three hours and one and a half days, depending on the size of the hole and how long it takes to dispose of the dirt.
How do we know how deep to dig?
 Our crew members use what's known as a dig sheet provided by the pool manufacturer to know how deep to excavate the hole at certain points.
We mark these points with paint on the ground; these are called hash marks.
As we dig, we check the depth of the hole at each hash mark until the desired depth is achieved.
Our excavated hole is about a foot larger than the ouside of the pool and about 2 inches deeper than the pool depth.
In the next phase we'll place 2" of gravel in the hole which will be the foundation the pool will rest on.
What are some common excavating mistakes?
1. Overdigging
Inevitably sometimes the person excavating will dig too deep.
The natural remedy is to place soil back in the hole to raise it up to the proper depth.
That's a big no-no.
It will most likely settle over time causing the pool to shift and a chain reaction of other problems to occur.
The only remedy is to leave the area too deep and use gravel to bring it back up to grade.
2. Unstable soil or organics under the pool
Sometimes when digging you realize that the soil is not stable or that there is organic material buried in the pool area.
Setting the pool on this material will result in settlement.
It all needs be removed, regardless of how much additional excavation is required.
3. Digging too tight
After the pool is set in the hole there needs to be enough room to get between the pool and the side wall of the excavation to place gravel under the seats and steps of the pool. Typical overdig should be between 12 and 18 inches.
When does the pool typically arrive?

The pool will usually show up around lunch time of the first day, although it varies from job to job.
Once the pool arrives, our team will unload it with the excavator, set it on the ground, and begin installing the fittings and plumbing around the pool.
Related Articles:
- 7 Deadly Sins of Fiberglass Pool Installations
- Swimming Pool Excavation: 4 Questions You May Not Think to Ask
- Inground Pool Elevation: How High Should I Set My Pool?
- Can Fiberglass Pools Be Built On Fill Dirt?
Phase 2: Placing the Gravel Foundation

After the excavation is complete, we will place a 2" thick layer of gravel in the hole which the pool will rest on.
This gravel base determines the height of the pool so we use a laser level to set the gravel at precisely the right elevation.
We are usually at this point at the end of day one or the beginning of day two of construction.
It's important to note that we use gravel instead of sand for our installations. Let's talk about why.
Sand vs. gravel for installation: Which is better?
Back in the early 2000s, we installed roughly our first 250 pools on sand.
Over the following years we found that a certain percentage of these pools had problems such as pool settlement, bulges in the side walls of the pool, and leaks in fittings and plumbing around the outside of the pool.
We determine d all of these issues resulted from using sand…and if you consider the properties of sand, it makes sense why.
First, sand liquefies when saturated with water.
What do you think will happen to a pool filled with water that weighs tens of thousands of pounds and is resting on bed of liquid? Doesn't sound too reassuring, does it?
Second, when backfilling around the outside of a pool with sand, it’s almost impossible to compact that sand 100%.
What do you think happens over the following 18 months when the sand backfill finally settles? It puts pressure on the side walls of the pool and the plumbing that it encases.
This causes the fittings the plumbing is connected to leak.
The weight of the saturated sand on the side walls of the pool can also cause them to bulge inward.
We eventually switched from sand to gravel backfill and the moment we did so all of these problems vanished.
We haven’t had a single fitting leak, wall bulge, or pool settle in our past 450 pools and counting.
Okay, now that our gravel base is laid, we're ready to set the pool in the hole.
How do we lift the pool?
About 99% of the time, we use our excavator. That's convenient because it's the same machine we use to dig the hole.
Occasionally we will use a crane, such as when we need to lift the pool over a house, wall, or other structure.
Some of our most interesting deliveries have involved floating pools down the river, pushing them down narrow city alleys, and even flying them in via helicopter!
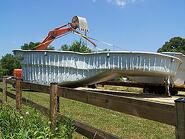 |
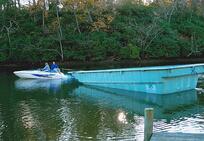 |
 |
But regardless of how we get the pool to your backyard, one of the most critical junctures in the installation process is when the pool is set in the hole and leveled.
Why is properly setting and leveling the pool so important?
Basically, the entire pool floor must rest on a solid foundation to ensure the pool is structurally sound.
This prevents it from shifting and settling over time.
Our team will strive to achieve our goal of getting the pool withing one-half inch of level, all while ensuring the entire pool floor rests firmly on the gravel foundation.
We feel it's important for anyone considering a fiberglass pool to know that fiberglass pools are never perfectly level.
Again, our goal is to get every pool within a half-inch. The industry standard is one inch, but it's not uncommon to see fiberglass pools far more out of level than that.
To ensure the pool is to our standards, our team will lift and re-set the pool shell as many times as needed.
A common mistake is to rush this critical phase of the process. That only leads to pools being out of level or eventually shifting or settling due to the pool shell not resting on a proper foundation.
We usually have the pool in the hole and level by the end of day one or by the end of day two depending on the project.
Related articles:
- Sand vs. Gravel: Which is Better for a Fiberglass Pool Installation?
- How Level Should a Fiberglass Pool Be?
- Read about our Level Pool Promise here
- Cool Video: How to Unload, Lift, and Set a Fiberglass Pool
Phase 3: Plumbing the Pool and Filter System
What is the filter system?
The filter system is composed of two major components: the pool pump and the filter.
The pump circulates the water and the filter removes debris and small particles from the water.
At the filter system you also typically find other elements such as valves that control the flow of water, salt water chlorinators if you have one, a switch for the pool light, and a heater if desired.
Where is the filter system typically located?
Usually within 30 to 60 feet from the pool, but it can be much further away if the site dictates.
If possible, it's best to locate the pool equipment (i.e. filter system) at the house, preferably somewhere inconspicuous.
It's also not uncommon to locate it in the yard, somewhere out of plain view.
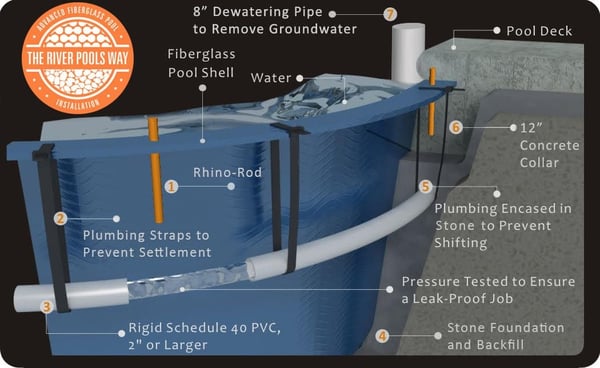
What is the River Pools Everflo Plumbing System?
Everflo plumbing is River Pools' unique method of plumbing fiberglass pools that allows us to give a 5-year warranty against leaks in the plumbing or fittings in the pool shell.

Ever Flo Plumbing consists of:
- All rigid PVC pipe as opposed to flexible PVC pipe (read more below)
- Plumbing straps that secure the pipe to the pool shell to prevent settlement
- Heat bent PVC where necessary to allow plumbing to flow around turns
- All plumbing is pressure-tested to ensure they are leak free
- Gravel backfill to eliminate downward pressure on fittings and pipe
Why do you pre-plumb your pools?
Pre-plumbing a fiberglass pool simply means that we run all the plumbing around the pool shell before placing it in the hole.
We do this because it gives us more room to work and allows us to visually inspect every fitting and piece of pipe thoroughly to ensure it meets our standards.
We typically begin this process as soon as the pool is unloaded from the truck.
Related Articles:
- Rigid PVC vs Flexible PVC: Which is Better?
- 5 Keys to Perfect Fiberglass Pool Plumbing
- Fiberglass Pool Plumbing Video: How to Install Skimmers, Returns, and Main Drains
- How to Heat Bend Rigid PVC Pipe Video
- Where Should I Locate My Pool's Pump and Filter System?
Phase 4: Backfilling the Pool Shell
_-_copy-resized-600.jpg?width=269&name=img_2907_(2)_-_copy-resized-600.jpg "Fiberglass Pool Backfilling") Once the plumbing is complete and the pool is set in the hole and leveled it's time to start filing the pool with water and backfilling around the outside with gravel.
Once the plumbing is complete and the pool is set in the hole and leveled it's time to start filing the pool with water and backfilling around the outside with gravel.
It's important that the gravel on the outside and the water on the inside are brought up together to equalize the pressure.
It's also important to install what's known as a drain pipe during this phase of construction.
The drain pipe is an 8" PVC pipe that extends from the top of the patio to the bottom of the excavation.
There is no permanent pumping system installed. This pipe simply allows us to access any ground water around the pool in case the pool requires draining in the future.
Usually by the time we begin backfilling the pool the electrician will have begun wiring the pool equipment.
Ideally, the pump and filter system will be wired so we can start circulating the water as soon as the pool is full, although sometimes there are circumstances that prevent this.
What type of gravel do you use to backfill the pools?
The type of gravel used for backfilling around a fiberglass pool is critical.
We use clean crushed blue stone roughly 3/4" - 1" in size.
Clean (in this regard) means that the gravel is free of fines, also known as stone dust.
Gravel with stone dust would not compact when we dump it in the hole and therefore would require manual compaction...which is exactly what we're trying to avoid with sand.
Clean crushed stone compacts when placed. It drains very well. The point-on-point friction between the pieces of stone locks them together, allowing it to hold well on the side walls of the pool.
This is why we prefer crushed stone over pea gravel, which is round and acts like little ball bearings on the outside of the pool and can more easily slide down the pool wall if and when the pool is drained.
Usually by the end of day two or three, our team has the pool shell installed and full of water with all of the plumbing completed. This completes initial installation phase of construction.
Before beginning the coping and patio work we will need an inspection.
This is also the point at which we would install waterline tile on the pool if specified.
Depending on weather and our schedule, it's not unusual to have a delay of one to two weeks between the completion of this initial phase and the beginning of the next major phase of construction, the coping and patio.
Related articles:
- Informative Video: What Type of Gravel is Best for a Fiberglass Pool Installation?
- How Not to Backfill and Install a Fiberglass Pool...Scary Pictures!
Phase 5: Coping and Decking
With the pool completely backfilled and inspections approved our team is ready to install the coping around the top of the pool shell and the pool patio.
There can be a delay of a few days to two weeks before the patio crew arrives depending on weather and inspection schedules.
The patio can take anywhere from two to five days to install depending on the size of the patio and material used.
One of the most important roles of the patio is locking the pool shell into place.
We've developed a unique methodology to accomplish this called The River Pools Way, specifically in advanced fiberglass pool installation.
What is The River Pools Way: Advanced Fiberglass Pool Installation?
Check out the following video to learn how The River Pools Way eliminates the four most common fiberglass pool installation problems!
The River Pools Way uses our unique River Rods that fuse the pool and patio together to prevent structural problems.
We also pour a thicker locking ring of concrete around the perimeter of the pool.
The River Rod and concrete collar, in conjunction with the clean crushed stone virtually eliminate the possibility of structural problems associated with pool movement.
This methodology along with our experienced team allows us to extend a limited 5-year workmanship warranty to our customers. It covers any structural issues related to pool or patio movement.
-resized-600.jpg?width=196&name=18_inch_cascade_(2)-resized-600.jpg "cantilevered concrete coping")
What is cantilevered concrete coping, how is it installed, and why is having an experienced contractor so important?
We discussed types of pool coping on our patio and coping page, but it's important to understand the importance of having an experienced contractor pour your cantilevered concrete coping.
Check out the related articles below to see for yourself the unfortunate results of not having a seasoned mason perform your work.
You'll also see a video demonstrating our method of pouring cantilevered concrete coping.
Related Articles:
- How to Form and Pour Cantilevered Concrete Coping Video
- Why is Pouring Concrete (Cantilever Coping) Around a Fiberglass Pool so Difficult? (Must See Photos)
- How NOT to Install Paver Coping on a Fiberglass Pool Video
Phase 6: The Pool Fence
 With the pool installed and the patio complete we're on the home stretch.
The typical project at this point has been in process for anywhere from two to five weeks depending on the weather.
All we need now to wrap everything up is an approved pool fence.
Let's take a moment to cover some popular fence questions.
Is a fence required on every inground pool?
Yes, according to the national building code, every inground pool requires a barrier that completely surrounds the pool.
How tall does the fence need to be?
The minimum fence height requirement is 48", but each locality has the ability to require a higher fence if it chooses.
What other requirements must the fence meet?
There are quite a few specifications.
Some of the most noteworthy are that the gates must swing out away from the pool, they must self close and self latch, and the gate latches must be at least 54" from the ground.
Can the fence run to the house or must it entirely close the pool?
The house can serve as part of the pool barrier.
In other words, you can run the fence to the house.
But any door that leads from the house to the enclosed area containing the pool must be alarmed.
Typical home security alarms do not meet the code requirement but alarms are available that are battery operated and typically cost between $60 and $100.
How close does the fence need to be to the pool?
There is no requirement that states the fence must be within a certain distance from the pool.
As long as the pool is completely surrounded by a barrier, the location relative to the pool is irrelevant.
How is the fence installed?
Typical pool fence is installed by digging post holes in the ground outside of the pool patio. Sackcrete is used to secure the fence posts in the ground.
Related Articles:
Installation Summary
Hopefully you've found this page informative. Just to wrap things up, here are 5 takeaways you should remember about fiberglass pool installations:
- The total process usually takes anywhere from three to six weeks for a typical project.
- The type of material used under and around the outside of the pool is critical. Based on our experience we feel gravel is the way to go.
- Setting and leveling the pool correctly is imperative if you want your pool to look great and last a long time.
- How the pool and patio tie together is extremely important. Our methodology, The River Pools Way: Advanced Fiberglass Pool Installation, uses composite River Rods to fuse the pool and patio together.
- And finally, we want to see your kids in bathing suits when we arrive.
Learn why we expanded to manufacturing fiberglass pools and how our methods revolutionized the industry.

If you're looking for even more fiberglass pool installation info, check out Jason's article that was published in the January 2013 edition of Aqua magazine:
Top 5 Fiberglass Pool Installation Problems and Solutions
Editor's note: This page was updated on January 2, 2019.