


Fiberglass vs Concrete vs Vinyl Liner | Installation & Construction
 Over the years we’ve helped answer millions of questions from potential pool buyers. We've found that when people understand the basic construction process, it empowers them to make a more confident decision regarding which type of inground pool is right for them.
In this article, we provide an overview of the basic construction phases of concrete, fiberglass, and vinyl liner pools.
For a more in-depth comparison of these pool types, be sure to check out our free ebook “Comparing Fiberglass, Concrete, and Vinyl Liner Pools in the Modern Age.”
Concrete Pool Construction
Phase 1: Concrete Pool Excavation
This phase is similar for all three types of inground pools.
Earth is excavated and either hauled off-site or used on the property.
This is not a decision to make the day excavation begins. Even if your builder does not address dirt removal, be sure to bring it up in advance as it often requires time to find a dump location, plus there can be associated costs.
Duration: Several hours to two days depending on the pool size, equipment used, soil type, and the means of dirt removal.
Project Time Frame: Day 1
Phase 2: Steel Placement
 Concrete has a very high compressive strength, meaning it is resistant to crushing forces. However, it has a relatively low tensile strength, which means it doesn’t naturally flex or bend very well.
Adding steel to concrete structures, such as swimming pools, increases the structure's ability to flex and move with its environment.
A cage of steel bars, also called rebar, is tied together and eventually encased in the concrete shell creating a web of strength to help prevent structural failure.
Duration: 1–2 Days
Project Time Frame: Week 1
Phase 3: Concrete Pool Plumbing
 Before the concrete shell is placed, the pipe needed to circulate the pool water is installed.
Much of this plumbing was installed before the steel phase; however, some is supported by the steel and is installed after.
This plumbing should be capped and pressure tested during the placement of the concrete shell.
Duration: 1–2 Days
Project Time Frame: Week 1–2
***Inspection: Typically, a plumbing and steel inspection is required at this point before the placement of the concrete pool shell.
Phase 4: Concrete Shell Placement
 By this point, your project has likely been underway for several days to two weeks and now it’s time for the pool shell to take shape.
Most people have heard the terms gunite or shotcrete. These terms describe two different processes used to place the concrete shell, but at the end of the day, both processes produce concrete pools.
During this phase, concrete is shot into place with a nozzle, then shaped using straight edges and trowels.
This fascinating process is long, loud, and dirty. Plastic screens are often placed to prevent overspray from infiltrating surrounding areas.
Duration: 1–2 Days
Project Time Frame: Week 1–2
Phase 5: 28-Day Cure Time
Many people mistakenly believe that concrete “dries,” but as it hardens it actually cures.
Curing is the process in which specific molecules within cement become hydrated with water. The more hydrated or cured concrete is, the stronger it becomes.
It takes concrete 28 days to achieve a relatively full cure and achieves its best cure when water is introduced to the surface. Consequently, it is recommended that the concrete pool shell be sprayed with water 2–3 times per day over a 28-day period.
And yes, just in case you’re wondering, concrete pool builders typically rely on their customers to do this.
Duration: 28 days
Project Time Frame: Weeks 3–10
Waterproofing
Many concrete pool builders consider waterproofing their pool shells optional. However, it is an important process that needs to be accounted for.
Waterproofing products seal the pool shell, which prevents water from migrating through the structure.
Any rough areas of the shell are made smooth, the surface is thoroughly cleaned, and the waterproofing material is sprayed or rolled on.
Duration: 1–3 days
Project Time Frame: Within the 28-Day curing process
Phase 6: Tile and Coping
 Because the surface of concrete pools is porous and subject to staining at the waterline, tile is needed along the top 6 inches of the pool.
Coping is the concrete or stone border placed around the perimeter of the pool and provides the transition from the pool to the patio.
Both tile and coping are typically done in conjunction by the same team or contractor.
Duration: 3 days to 2 weeks
Project Time Frame: Week 11
Phase 7: Patio Installation
Now, the pool shell is beginning to look somewhat finished and it’s time to install the patio surrounding it.
During this phase, the base beneath the patio area is prepared by placing and compacting stone.
Next, the patio, which is typically either concrete, pavers, or natural stone is installed.
Duration: 1–2 weeks
Project Time Frame: Week 12
Phase 8: Plaster
 The final construction phase is the application of the interior surface of the concrete pool.
This is typically plaster, which is a mixture of cement, sand, marble dust, pigment, and water.
It is pumped through a hose, shot onto the pool shell, and troweled to a flat finish.
Other finishes, such as Pebble-Tec or Diamond Brite, are applied in similar fashion but after troweling, the “cream” on the surface is removed to reveal the decorative aggregate within the mix.
It’s important to remember when filling a concrete pool, never stop the flow of water until it reaches the tile line because it could leave a “bathtub ring” that would be difficult to remove.
Duration: 1 day
Project Time Frame: Week 12
Phase 9: Concrete Pool Start-Up
The initial start-up of a gunite/concrete pool can be overwhelming.
Because the surface of the plaster is not cured for 28 days, it is susceptible to damage and staining from water that is not properly balanced. Consequently, upon initial start-up, it is crucial that water chemistry is checked and balanced daily.
The pool must also be brushed twice per day for at least the first 10 days after filling to remove plaster dust from the surface.
Pool heaters should not be started up until all plaster dust is removed. No chlorine should be introduced for at least 48 hours. Swimmers and pets should avoid entering the pool until the water is balanced.
Be sure to receive specific written instructions for starting up a concrete pool from a reliable source.
Duration: 10 days
Project Time Frame: Week 14
Average Concrete Pool Construction Time Frame: 3–6 months
Some projects and builders will be faster and some slower.
Vinyl Liner Pool Construction
Phase 1: Vinyl Liner Excavation
When excavating for a vinyl liner pool, the hole is dug approximately three feet larger than the finished pool around the entire perimeter. This allows space for vertical braces that support individual wall panels.
Some builders dig the entire hole initially, including the deep end.
Others excavate in two phases, digging enough to install the perimeter wall panels first, then commencing excavation of the deep end.
Duration: 1–2 days
Project Time Frame: Day 1–2
Phase 2: Wall Panel Assembly
 Vinyl liner pool walls are composed of a series of panels made of either steel, plastic, or aluminum. These panels are bolted together and secured with braces for support.
Note: For those considering a vinyl liner pool with metal wall panels, we would caution you to avoid salt water chlorination systems because of the corrosion that will result when the liner begins leaking.
These wall panels are typically 42 inches tall, which is why the shallow end of vinyl liner pools are typically that depth.
During assembly of the wall panels, any plastic or fiberglass steps or “buddy seats” are installed as well.
Duration: 1 Day
Project Time Frame: Day 2–3
***Inspection needed before pouring footing
Phase 3: Concrete Footing
After assembly of the perimeter wall panels is complete and the footing inspection approved, an 8-inch-deep concrete footing is poured around the outside perimeter of the structure.
This locks the wall panels in place and prevents them from shifting over time.
Duration: ½ Day
Project Time Frame: Day 3–4
***Inspection needed after pouring footing
Phase 4: Vinyl Liner Pool Plumbing
Plumbing is installed around the perimeter of the pool and to the pump and filter system.
Duration: 1 Day
Project Time Frame: Day 3–4
Phase 5: Installing the Vinyl Liner Pool Base
Now that the wall panels are assembled and secured, the plumbing is run, and the hole is completely excavated and shaped up, it’s time to lay down the material that covers the exposed earth and that the liner rests upon.
This material is mixed then troweled in place and is typically either a blend of vermiculite, cement, and water or a blend of sand, cement, and water.
It’s critical to obtain a smooth finish on the base of a vinyl liner pool because any imperfections will be seen through the liner.
Duration: 1–2 Days
Project Time Frame: Day 4–5
Phase 6: Installing the Liner

Now it's time to install the liner.
Vinyl liners are typically 25–30 mils thick—about the thickness of about 10 sheets of paper.
The top of the liner has a “bead” that inserts into a track which is mounted to the top of the wall panels.
The liner is placed into the pool, “snapped” into place, then form-fitted to the shape of the pool using a vacuum to remove the air behind the liner.
Once the liner is adjusted to remove wrinkles, the pool is filled with water. When there’s enough water to hold the liner in place, the holes for any skimmers, lights, return jets, or the pool steps are cut and faceplates are installed to hold the liner in place.
The pool is then completely filled with water.
Duration: 1 Day
Project Time Frame: Day 5–6
***Bonding inspection required
Phase 7: Vinyl Liner Patio Installation
Although some contractors opt to complete the patio surround before installing the liner, most prefer to get the initial pool installation completed first.
Either way, one key to success regarding patios around vinyl liner pools is ensuring that the material beneath the patio is stable.
This can be a challenge because, as you recall, almost three feet of earth is removed around the outside perimeter of the pool. When this large void is backfilled it must be properly compacted.
Many times, contractors will backfill with the same dirt that was removed without using proper compaction methods and this can lead to structural patio problems down the road.
Duration: 1–2 weeks
Project Time Frame: Week 3/4
Phase 8: Vinyl Liner Pool Start-up
The standard start-up procedure for a vinyl liner pool is to test and adjust the water chemistry to bring it within accepted ranges and to clean the filter as needed until the water is clear.
Duration: 1–2 Days
Project Time Frame: Week 4/6
Average Vinyl Liner Pool Construction Time Frame: 4-8 weeks
Some projects and builders will be faster and some slower.
Fiberglass Pool Construction
Note: We at River Pools have specialized in fiberglass pools for years. We've had the opportunity to learn a lot over the years regarding the right and wrong ways to install fiberglass swimming pools. If you are considering installing your own fiberglass pool, be sure to check out some of the resources linked to in this section, as it will greatly reduce your learning curve.
Please note: River Pools does not sell fiberglass pools for DIY projects, and we suggest working with an installation professional in your area rather than trying to tackle this daunting task on your own!

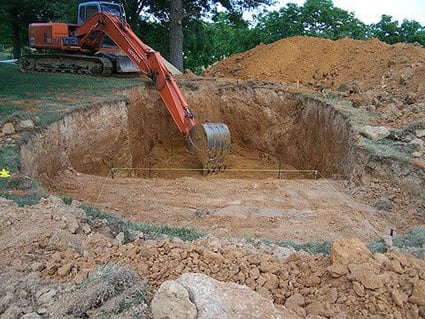
Phase 1: Excavation
When excavating for a fiberglass pool, installers typically allow 12–16” of overdig to provide room to set the pool and to ensure the pool is backfilled properly.
The hole is dug about 4 inches deeper than the depth of the pool to provide room for the stone base material.
Duration: 3 hours to 1 day
Project Time Frame: Day 1
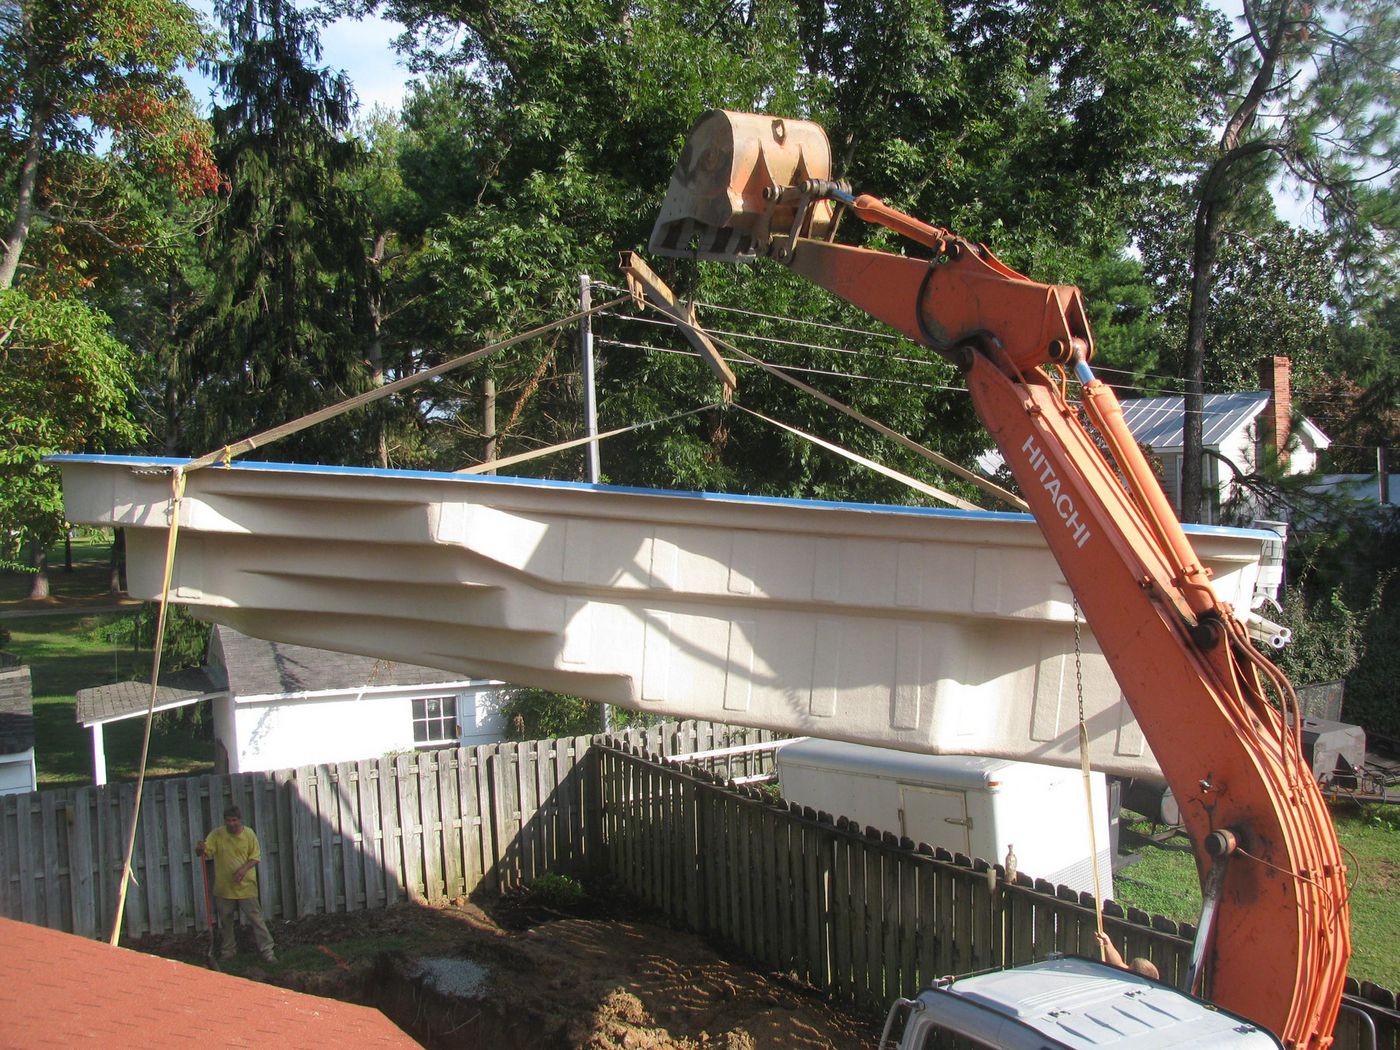
Phase 2: Pool Delivery
 The pool typically arrives on a flatbed trailer on day one, and the installer unloads it with an excavator. They sometimes use other equipment such as a crane or reach forklift as needed, depending on the conditions.
The pool is unloaded and placed on the ground, where it will be plumbed in preparation for setting.
Duration: 1–2 hours
Project Time Frame: Day 1
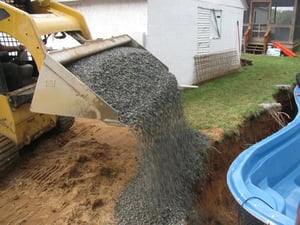
Phase 3: Placing the Stone Pool Base and Plumbing
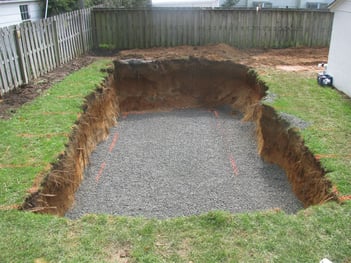
Usually, by mid afternoon the excavation is complete and the fiberglass pool shell is on site.
The installer places the stone base in the bottom of the excavation and works on plumbing the pool as it sits on the ground.
Both the stone base and our plumbing method are part of our unique fiberglass pool installation methodology.
The River Pools Way’s Advanced Installation is a series of best practices that have successfully eliminated many of the common fiberglass pool installation related problems we have encountered over the years.
Duration: 2 hours
Project Time Frame: Day 1
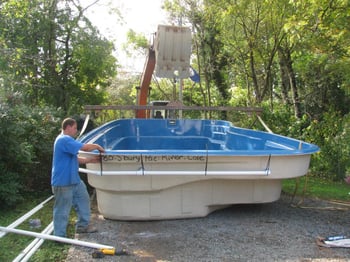
Phase 4: Setting and Leveling the Pool
 Towards the end of Day 1 or at the beginning of Day 2, the fiberglass pool shell is set into the hole, ensure it is in precisely the right location, and get it level.
Duration: 1–2 hours
Project Time Frame: Day 1 or 2
Phase 5: Backfilling and Filling with Water
 Once the pool is level, the installer will begin backfilling around the outside of the fiberglass pool with stone.
The installer places stone backfill around the pool as it fills with water. Keeping both the backfill and water within 12 inches of each other equalizes the pressure from both sides.
Stone is also packed under steps and bench seats to remove any voids.
Pool designs with large tanning ledges/shelves are often backfilled with a material called flowable fill, which is a slurry mix of cement, sand, and water. This solidifies under the ledges, providing a solid base.
Duration: 2–6 hours
Project Time Frame: Typically Day 2
***Bonding inspection required
Phase 6: Patio Installation
When installing hardscaping around a fiberglass pool, it is essential to pour at least 12 inches of concrete around the pool perimeter.
It is also best practice to tie the pool shell and surrounding concrete together by some means. This is why we developed the "River Rod", which is a composite reinforcing rod that, when installed into the pool shell, fuses the pool and patio together.
Duration: 1–2 weeks
Project Time Frame: Week 2–3
Phase 7: Fiberglass Pool Start-Up
Because the surface of fiberglass pools is factory installed and an integral part of the pool shell, it is fully cured and swim-ready from the moment it is produced.
Once the pool is full and the pump and filter system are up and running, the water should be balanced and filter cleaned accordingly. No need for brushing.
Duration: 1–2 Days
Project Time Frame: Week 2–4
At River Pools, we specialize in fiberglass pools. However, we acknowledge that both concrete and vinyl liner pools have their benefits.
If you’d like a comprehensive review of the pros and cons of all three pool types, be sure to download our free ebook below. You can also check out our full line of fiberglass pools and contact an independent installer near you to request pricing.
Learn why we expanded to manufacturing fiberglass pools and why our methods are revolutionary.

We hope you’ve found this guide helpful. If you have any questions or comments please leave them below.
Thanks and Happy Swimming!

Up Next:
Can a Fiberglass Pool Be Installed Above Ground?
Should My Swimming Pool Have a Cooler/Chiller? Temperature Comparison Video
How Much Dirt Comes Out Of A Pool Excavation? (Jobsite Video)
Editor's note: This blog article was updated on April 17, 2019.
Editor's note: This article was updated on December 6, 2023.